
I had decided to make a sustainable, organic garden- not because I'm an enviro-nut, but because the research and numbers show it to be the healthiest and cheapest way to provide the best food I can. With my compost bin already in motion, it was time to order seeds. Being interested in ongoing sustainability, I discovered that most hybrid vegetables are essentially mules. They are mixed breed crops, pumped up with added "hormones" to increase production, size, color, etc. This makes a vegetable that weighs more, is larger, or has some other particular characteristic that will make it sell better in the grocery store... but they can't propagate (or at least, seeds from hybrids produce very stunted offspring). I decided upon "heirloom" seeds instead. Heirloom seeds get their name from their lineage being passed down. Each line of heirloom seeds can be traced back to a specific family or locality up to a couple hundred years ago (long before GMO's came into being). Think of them as the pedigreed vegetables of the gardening world. Their lineage has been meticulously preserved, and we can literally be eating the same tomatoes that they were growing for backyard barbeques during the Revolutionary War. I ordered as much of my seeds as I could from Seed Savers Exchange, an online seed bank dedicated to the preservation of seed line heritage. For the vegetables I had chosen that SSE did not have available, I ordered from Park Seeds, which I chose based on reviews of their quality and customer service.
Once my seeds arrived, I referred back to my garden planner at GrowVeg.com. It showed me which plants to start indoors based on the final frost date for my region. Seeds don't actually need compost or nutrients or even sunlight to begin growing. You can sprout seeds on a wet paper towel, and as long as they have heat and moisture, they're perfectly happy.
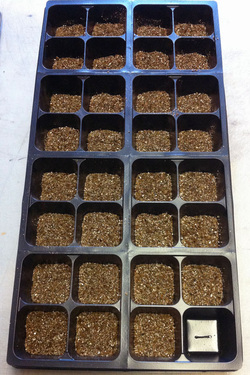
As suggested in the SFG book, I began growing my seeds indoors directly in vermiculite. The seed trays I got are about 11x21, and hold eight 4-cell sections, all loosely connected, and cost about 79¢. Each cell has a hole in the bottom to allow water to wick up into the roots, preventing them from drowning. I bought a few cheap stainless steel cookie sheets at Walmart to place them on and hold extra water. After filling the cells about 2/3 with vermiculite, I began pouring water into the one cell I left open (this is easier than trying to pour water next to the tray. Using warm water, it took THREE 44 oz cups to completely moisturize the vermiculite!
In the end, the cookie sheets were a bad idea. While they technically worked (as in, they held water), they rusted. Even stainless steel isn't totally impervious to oxidation. I don't know if it would have harmed the plants, but I wasn't comfortable with the thought of the plants I will be eating starting life in puddles of rusty water.
Side rant: It was SO hard to find decent information on vermiculite alone. The entire Internet has been taken over by blogs about people growing their own "cannibis" plants. People, you're not fooling anybody. We all know that you're not just growing your own "medicine" to treat your ailing conditions. You're growing pot to smoke it, so stop being such freakin' hipsters about it. :P
I placed the trays on a table in front of a South-facing window and made sure they had lots of sun to warm the soil. The Amish Snap Peas sprouted within two days. Other plants like the Roma tomatoes, chives, and marigolds began sprouting within the next two weeks. Something else also sprouted: Cobweb Mold. It ended up killing 2-3 plant starts, though it was apparent in every cell. At first, I misidentified it as simple dust gathering moisture, but later I discovered that molds LOVE vermiculite, and that is the favorite medium of people who make a hobby of growing "spores, molds, and fungus." (RIP Harold Ramis) To combat the mold, I bought some Neem Oil. The extract of the neem plant from India is a fantastic organic fungicide/ pesticide. It is not toxic to the plants, people, or animals, and when diluted and sprayed over the plants and soil creates an effective barrier against many pests and molds.
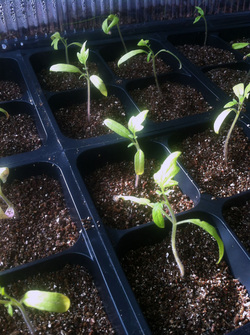
Because every seed is a potential plant, starting plants indoors is a very efficient method. Into each cell, I had dropped only 2-3 seeds. With my tomato plants, I got three good plant starts in each cell. I had similar good results with my broccoli, cauliflower, and marigolds. It's harder to tell with the Parade onions, chives, and oregano, but all the peas but one germinated and grew quickly!
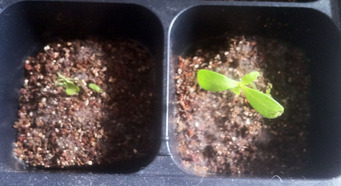
After about a month of caring for the new plants and fighting the cobweb mold, I decided to transplant my good starts into a new container. It's basically the same size as before, but with the addition of a made-to-fit water holder to go underneath the cells, and a clear plastic top tall enough for established plants, making them little greenhouses. The tomatoes had already gotten their "true leaves," so this was a good time for it. It allowed me to re-treat everything with Neem from the get-go, and separate each good seedling into its own cell. I haven't had a single instance of cobweb mold since then.
NOTE: When transplanting small plant starts, handle them by their leaves, not their stems. I always thought the leaves were more important, being the vehicle of photosynthesis and all, but even a "light" squeeze from our hands can damage the fragile vascular systems inside the stems. That actually makes more sense, since a plant can always grow new leaves.

I've already talked about how growing vegetables by the square foot or starting them in little grid containers is so very much like Minecraft, but when I began my indoor sowing, I was shocked!
| In Minecraft, when you set up a farm, you can't simply throw your seeds out onto a grassy block. You have to till the sol with a hoe, then you have to wait for the blocks to change color, signifying that they are hydrated enough to successfully take seeds. Skip to minute mark 14:35 to see an example of this. | When I began pre-soaking my vermiculite for seeding, it did the exact same thing! I was so excited, I had to set up a second tray in order to get it on video. I sped the video up to fit into about 40 seconds, but the original video was only about two and a half minutes anyway, so the visual change is very quick. |
HOW FUN IS THAT?!

 RSS Feed
